Assembling Image Grids
The first step in the Image Stitcher workflow is to choose a grid layout for the 2D or 3D blocks of your image data. You can manually select an image grid that corresponds to the type of image collection used to acquire the data (see Choosing Image Grid Layouts) or you can load a configuration file that contains the coordinates of each image file in the your dataset(see Loading Configuration Files).
The Layout Editor, shown below, lets you assemble the image grid that corresponds to the type of image collection used to acquire your data. For example, in a 7 x 7 grid with 10 layers. For each major type of image collection, such as row-by-row and column-by-column, there are several subtypes you can choose from.
Layout Editor window

| Description | |
|---|---|
|
Rows |
Lets you select the number of rows for the tiled image mosaic. |
|
Columns |
Lets you select the number of columns for the tiled image mosaic. |
|
Layers |
Lets you select the number of layers in the tiled image mosaic. For example, a dataset with 125 images, or Z-axis slices, may need to be assembled in a 5 x 5 image grid with 5 layers. |
|
Tile overlap (%) |
Lets you specify a tile overlap as a percentage, which can be a rough estimate. NOTE The selected overlap has no influence on anything except the initial position of the image tiles in the Stitching workspace. |
|
Grid |
Lets you choose the image grid that corresponds to the type of image collection used to acquire the data. You should note that each option is represented by a small figure. Row-by-row… The images are arranged in a grid, one row after another. After a row is finished the new one always starts at the same position as the previous one (like reading a text). The row-by-row options are illustrated and further described below.
Column-by-column… The images are arranged in a grid, one column after another. After a column is finished the new one always starts at the same position as the previous column. The column-by-column options are illustrated and further described below.
Snake by rows… The images are arranged in a grid, one row after another. After a row is finished the next one starts in reverse order at the position where the previous row ended. The snake by rows options are illustrated and further described below.
Snake by columns… The images are arranged in a grid, one column after another. After a column is finished the next one starts in reverse order at the position where the previous one ended. The snake by columns options are illustrated and further described below.
|
|
Close on apply |
If selected, the Layout Editor will close automatically when you click the Apply Layout button. Note If you are not sure how your images should be tiled, you should de-select this option. This will let you quickly apply another layout to your data. |
|
Apply Layout |
When clicked, automatically assembles the image data in the selected image grid. |


- Right-click the dataset that contains the images you need to stitch in the Data Properties and Settings panel and then choose Dataset Stitcher in the pop-up menu.
The Layout Editor appears.
- Click the Grid Layout tab, if the grid layout options are not shown in the dialog.
- Select the dimensions of the required image grid as follows:
- Choose the number of rows required in the Rows box.
- Choose the number of columns required in the Columns box.
- Choose the number of layers (Z-axis slices) required in the Layers box.
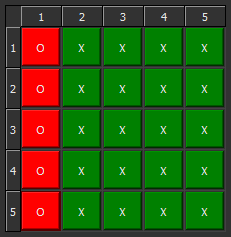
- If required, you can choose to exclude an image tile(s) in the selected image grid.
To exclude an image tile, click the corresponding cell in the grid layout table, as shown below.
- Select a tile overlap as a percentage.
Note The selected overlap has no influence on anything except for determining the initial position of the image tiles in the Stitching workspace and can be rough estimate.
- Select how the grid layout should be assembled — row-by-row, column-by-column, snake by rows, or snake by columns.
- Click the Apply Layout button to assemble the image mosaic.
The tiled image mosaic appears in the Stitching workspace.
- Make sure that the grid corresponds to the type of image collection used to acquire the data. If required, you can reload the dataset.
If available, you can load configuration files that contain the coordinates of each image tile in a dataset. Configuration files can be saved from the results of stitching in Dragonfly, or you can create your own configuration files in the TXT file format that contain the native positions of the tiles acquired by the microscope. If a configuration file is not available for your data, you will need manually select a grid layout (see Choosing Image Grid Layouts).
Layout Editor window
- Right-click the dataset that contains the images you need to stitch in the Data Properties and Settings panel and then choose Dataset Stitcher in the pop-up menu.
The Layout Editor appears.
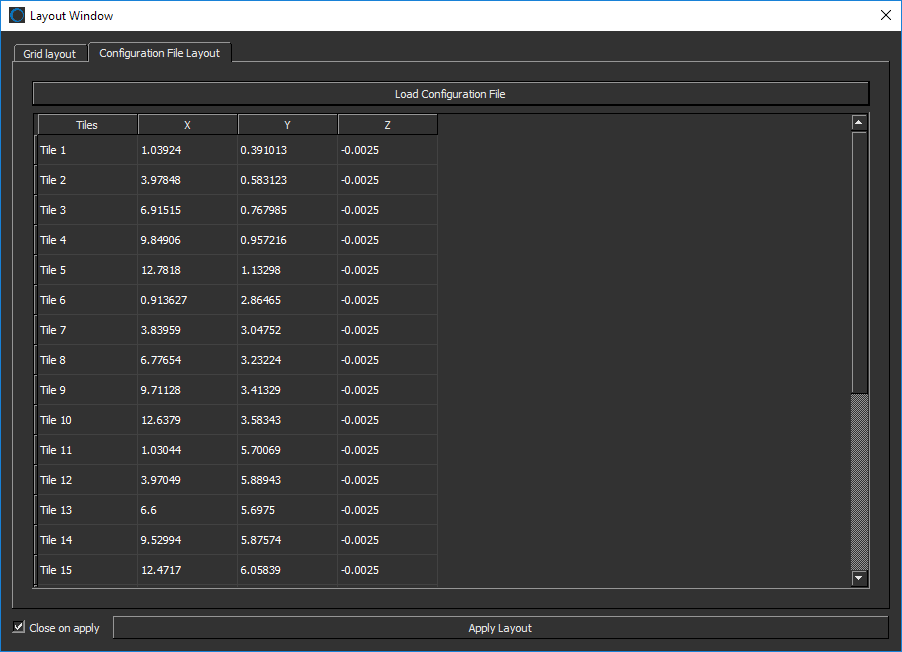
- Click the Configuration File Layout tab.
- Click the Load Configuration File button.
- Choose the required TXT configuration file in the Load Configuration File dialog.
- Click the Open button.
The coordinates of each image tile in the saved stitching result appears in the Layout Editor.
- Click the Apply Layout button to assemble the image mosaic.
The tiled image mosaic appears in the Image Stitcher workspace.
- Make sure that the grid corresponds to the type of image collection used to acquire the data. If required, you can reload the dataset.


